30 October 2012

A Few of My Favorite Spices (and Fancy Salt)

Bottom, starting in the front: Sea Salt (coarse grain hollow pyramids), Ground Nutmeg,
Sumac Berries, Smoked Spanish Paprika, Aleppo Pepper, Indonesian Cinnamon (Korintje)

One of the most interesting-shaped food accessories I use, although not often, is coarse grain sea salt. The delicate crystals are scooped from the surface of the brine and allowed to dry by wind and sun - creating a miniature hollow pyramid shaped crystal. The coarse salt is fantastic on fresh heirloom tomatoes drizzled with olive oil but maybe next time I'll try it mixed with an herb butter on warm bread.

Nutmeg is a great spice to keep around because it works in both sweet and savory dishes. I'm a firm believer that nutmeg works with any meat: ground beef, shredded chicken, pork chop, lamb kebob...yes everything. Take your nutmeg beyond the pumpkin pie - perhaps to eggnog land or latte town. Potato salad, scrambled eggs, sweet potato muffins, hot cider.

Turkish ground sumac berries were new to me until I found a spice store that allowed me to smell the herbs and spices before buying. Smelling food helps me think about how to use it. Ground sumac is often sprinkled on top of hummus (although paprika works too) along with a olive oil. It is fruity and sour and works well when you'd use lemon in a dish by brightening the flavors and adding that sour note to something already salty/sweet/bitter.

My love of Spanish paprika is in need of censoring. Smoky, peppery, bitter, sweet. Great mixed with salt, black pepper and olive oil and rubbed on vegetables before roasting or sprinkled on top of a creamy potato or squash soup. Eggs, chicken, salad dressing....

Aleppo pepper is another spice I'd never used before I had the chance to smell it but right after bringing it home I read that it was the number one underused/favorite spice of 2011. Okay. Good, I'm all about being trendy. It's got a little heat that definitely builds in dishes that sit overnight. It dresses up my favorite thin crust pizza (Whole Foods, no really) and works well with strong meaty dishes.

And finally cinnamon. Not just any cinnamon, because there are different kinds and when you find this out it will blow your mind, maybe, just a little. Indonesian cinnamon or korintje is strong, warm, spicy, sweet and delicious. I've put it in every baked good for the past year - chocolate muffins, banana bread, carrot cake, oatmeal cookies and would never have oatmeal without it. In fact, I should take it with me when I travel, that won't be suspicious at all!

13 April 2012

Rustic Dutch Oven Bread: No-Knead But You'll Need It

After the first bread making party (two people eating a warm loaf of homemade bread slathered with honey butter while standing in the middle of the kitchen) we fell in love! In love with fresh, warm bread. This version is even easier than the basic bread recipe, as if that's possible. This no-knead bread is cooked in a Dutch oven to replicate the steam in commercial ovens - it produces a crusty outside and soft, dense, chewy inside.
Time and yeast pretty much do all the work for you. Look at all those glorious bubbles! It only took 18 hours. It's a very wet dough but not terribly sticky. This is our second batch of dough - dryer than the original recipe featured in the New York Times - because we used 3/8 of a cup less water. The bread itself was still moist.
Pour it out onto a well-floured surface, fold a few times, cover and let rest. Voila! So easy.
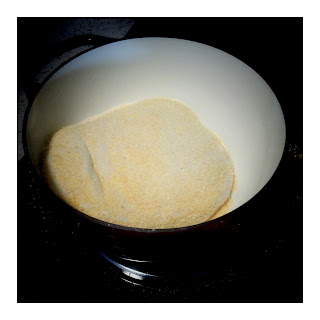
A little course-ground cornmeal to keep the dough from sticking to the towel and ultimately the Dutch oven. And then all you have to do it delicately drop the dough into the pot...POOF!!
Flour and cornmeal everywhere. No biggie.
Blurry action shot. We're really excited about digging into this rustic goodness. That kind of excited where you're drizzling a slice with honey while talking about adding cheese to the next slice.
Virgin slice. With Meadowfoam honey from Colorado. With melted Cotswald cheese (it melts into all the nooks and crannies!)


Recipe Time: Rustic Dutch Oven Bread: No-Knead but you'll Need It
adapted from the New York Times who adapted it from Jim Lahey, Sullivan Street Bakery
1 loaf
About 1½ hours plus 14 to 20 hours’ rising

3 C all-purpose or bread flour, more for dusting
1/4 tsp instant yeast
2 tsp Kosher salt
Cornmeal or wheat bran as needed.
1 1/2  C water
  1. In a large bowl combine flour, yeast and salt. Add 1 1/2 cups water, and stir until blended; dough will be shaggy and sticky. Cover bowl with plastic wrap. Let dough rest at least 12 hours, preferably about 18, at warm room temperature, about 70 degrees. {this is the how much water we used but their recipe called for 1 5/8 C}
  2. Dough is ready when its surface is dotted with bubbles. Lightly flour a work surface and place dough on it; sprinkle it with a little more flour and fold it over on itself once or twice. Cover loosely with plastic wrap and let rest about 15 minutes. {we covered it with a towel}
  3. Using just enough flour to keep dough from sticking to work surface or to your fingers, gently and quickly shape dough into a ball. Generously coat a cotton towel (not terry cloth) with flour, wheat bran or cornmeal; put dough seam side down on towel and dust with more flour, bran or cornmeal. Cover with another cotton towel and let rise for about 2 hours. When it is ready, dough will be more than double in size and will not readily spring back when poked with a finger. {we used cornmeal}
  4. At least a half-hour before dough is ready, heat oven to 450 degrees. Put a 6- to 8-quart heavy covered pot (cast iron, enamel, Pyrex or ceramic) in oven as it heats. When dough is ready, carefully remove pot from oven. Slide your hand under towel and turn dough over into pot, seam side up; it may look like a mess, but that is O.K. Shake pan once or twice if dough is unevenly distributed; it will straighten out as it bakes. Cover with lid and bake 30 minutes, then remove lid and bake another 15 to 30 minutes, until loaf is beautifully browned. Cool on a rack. {we used a 6 quart enamel Dutch oven and cooled it on a plate}


01 April 2012

Basic (Awesome) Bread

We made bread. It was great. You should make bread. It will be fantastic. We did not take a lot of step-by-step photos for this one because the recipe and technique are well documented by Alton Brown via recipe and multiple videos.

Plus, I think with bread you really have to feel it out and become one with the dough. I swear, digging your knuckles in to distribute and add fluffy air is such a dream. And look at that round lump of love up there. Yeah - good stuff, bread.


The tray of water underneath the upside-down cookie sheet really helped keep the bread moist and chewy and the crust was crisp but not too hard to slice through or chew. During the proofing step in the oven the recipe suggests the tray of hot water and we also turned the oven light on (the same technique we use for making our own yogurt).

Improvised cooling rack. The longest 30 minutes you'll ever wait. Did I mention you start the yeast 8 hours to overnight before the bread making? Sad lesson learned when we didn't get to eat bread yesterday. I suggest you use the cooling time to make delicious honey butter or melt some chocolate. Maybe slice ham and grind some mustard seeds in vinegar.

Recipe Time: Basic (Awesome) Bread
adapted from Alton Brown's Very Basic Bread
1 loaf

1 lb bread flour, plus extra for shaping
1 tsp instant rapid rise yeast
2 TBS honey
10 oz bottled or filtered water
2 tsp kosher salt
2 quarts hot water
Olive oil, for greasing the rising container
2 TBS cornmeal
1/3 C water
1 TBS cornstarch


Consider having a scale, a cooling rack, a large baking dish for water and a cookie sheet for baking. See Alton's videos for detailed instructions. Watching the techniques makes a lot more sense than just reading it. The directions we followed are below although we did not use a pizza peel - we used an upside-down cookie sheet for cooking and shaped it on a flour dusted counter.

------------------------------------
Alton's Directions

Combine 5 ounces of the flour, 1/4 teaspoon of the yeast, all of the honey, and all of the bottled water in a straight-sided container; cover loosely and refrigerate for 8 to 12 hours.

Place the remaining 11 ounces of flour, remaining yeast, and all the salt into the bowl of a stand mixer, and add the pre-ferment from the refrigerator. Using the dough hook attachment, knead the mixture on low for 2 to 3 minutes just until it comes together. Cover the dough in the bowl with a kitchen towel and allow to rest for 20 minutes. After 20 minutes, knead the dough on medium speed for 5 to 10 minutes or until you are able to gently pull the dough into a thin sheet that light will pass through. The dough will be sticky, but not so sticky that you can't handle it.

While the dough is kneading, pour half of the hot water into a shallow pan and place on the bottom rack of your oven.

Grease the inside of a large straight-sided container with the vegetable oil. Place the dough ball into the container and set on the rack above the pan of water. Allow to rise until doubled in size, approximately 1 to 2 hours.

Once the dough has doubled in size, turn it onto a counter top, lightly dust your hands with flour, and press the dough out with your knuckles; then fold 1 side in towards the middle of the mass and then the other, as if you were making a tri-fold wallet. Repeat the folding a second time. Cover the dough with a kitchen towel and allow to rest for another 10 minutes.

Flatten dough again with your knuckles and then fold the dough in onto itself, like you are shaping something that looks like a jellyfish. Turn the dough over and squeeze the bottom together so that the top surface of the dough is smooth. Place the dough back onto the counter and begin to roll gently between your hands. Do not grab the dough but allow it to move gently back and forth between your hands, moving in a circular motion. Move the dough ball to a pizza peel or the bottom of a sheet pan that has been sprinkled with the cornmeal. Cover with the kitchen towel and allow to bench proof for 1 hour, or until you poke the dough and it quickly fills back in where you poked it.

Place an unglazed terra cotta dish upside down into the oven and heat the oven to 400 degrees F.

Combine the 1/3 cup of water and the cornstarch in a small bowl. Uncover the dough and brush the surface with this mixture. Gently slash the top surface of the dough ball in several places, approximately 1/3 to 1/2-inch deep. Add more of the hot water to the shallow pan if it has evaporated. Slide the bread onto the terra cotta dish in the oven and bake for 50 to 60 minutes. Once the bread has reached an internal temperature of 205 to 210 degrees F, remove to a cooling rack and allow to sit for 30 minutes before slicing.


Related Posts with Thumbnails